How to Use Cursor AI to Code Faster
A practical guide to using Cursor AI: setup, Tab, Cmd+K and the Agent, project rules, Plan mode, checkpoints, and how to keep usage costs under control.


On this page
- Key takeaways
- What you need before you start
- How to set up Cursor step by step
- The three core features: Tab, inline edit and Agent
- Your first Agent task, step by step
- Agent modes, checkpoints and long tasks
- How to write Cursor rules that actually help
- Keep Cursor costs under control
- Common mistakes beginners make
- Advanced tips once you are comfortable
- Frequently asked questions
- Next steps
To use Cursor AI, download the editor from cursor.com, sign in on the free Hobby plan, open your project folder, and start with three tools: Tab for autocomplete, Cmd+K (Ctrl+K on Windows) for inline edits, and the Agent side pane (Cmd+I or Ctrl+I) for multi-file tasks. Add project rules so the AI follows your conventions, review every diff before you accept it, and you will code noticeably faster within the first week.
This guide walks you through setup, your first Agent task, rules, modes, checkpoints and cost control, with the common mistakes that slow beginners down. Screenshots are not included, so each step describes exactly where to click.
Key takeaways
- Cursor is a VS Code based editor, so you can import your extensions, themes and shortcuts in a few minutes.
- Learn three shortcuts first: Tab to accept suggestions, Cmd+K for inline edits, and Cmd+I to open the Agent.
- Project rules live in .cursor/rules as .mdc files (or a simpler AGENTS.md) and keep the Agent on your stack and style.
- Use Plan mode for big features and checkpoints to roll back when the Agent goes the wrong way.
- Default to Cursor’s own models such as Composer 2.5 to stretch your included usage; Pro is $20 per month and India has a Rs 649 Start plan.
What you need before you start
- A computer running macOS, Windows or Linux with your code (or a new folder) on disk.
- A Cursor account. The Hobby plan is free with no card and includes limited Agent requests and access to Composer.
- Git installed and your project under version control. This is your safety net when AI edits many files at once.
- Basic coding knowledge. Cursor speeds up developers; it does not replace understanding what the code does. Non-coders should look at our list of the best AI app builders instead.
If you are not sure which plan you need yet, start free. Our Cursor pricing guide explains when Pro, Pro+ or Ultra make sense.
How to set up Cursor step by step
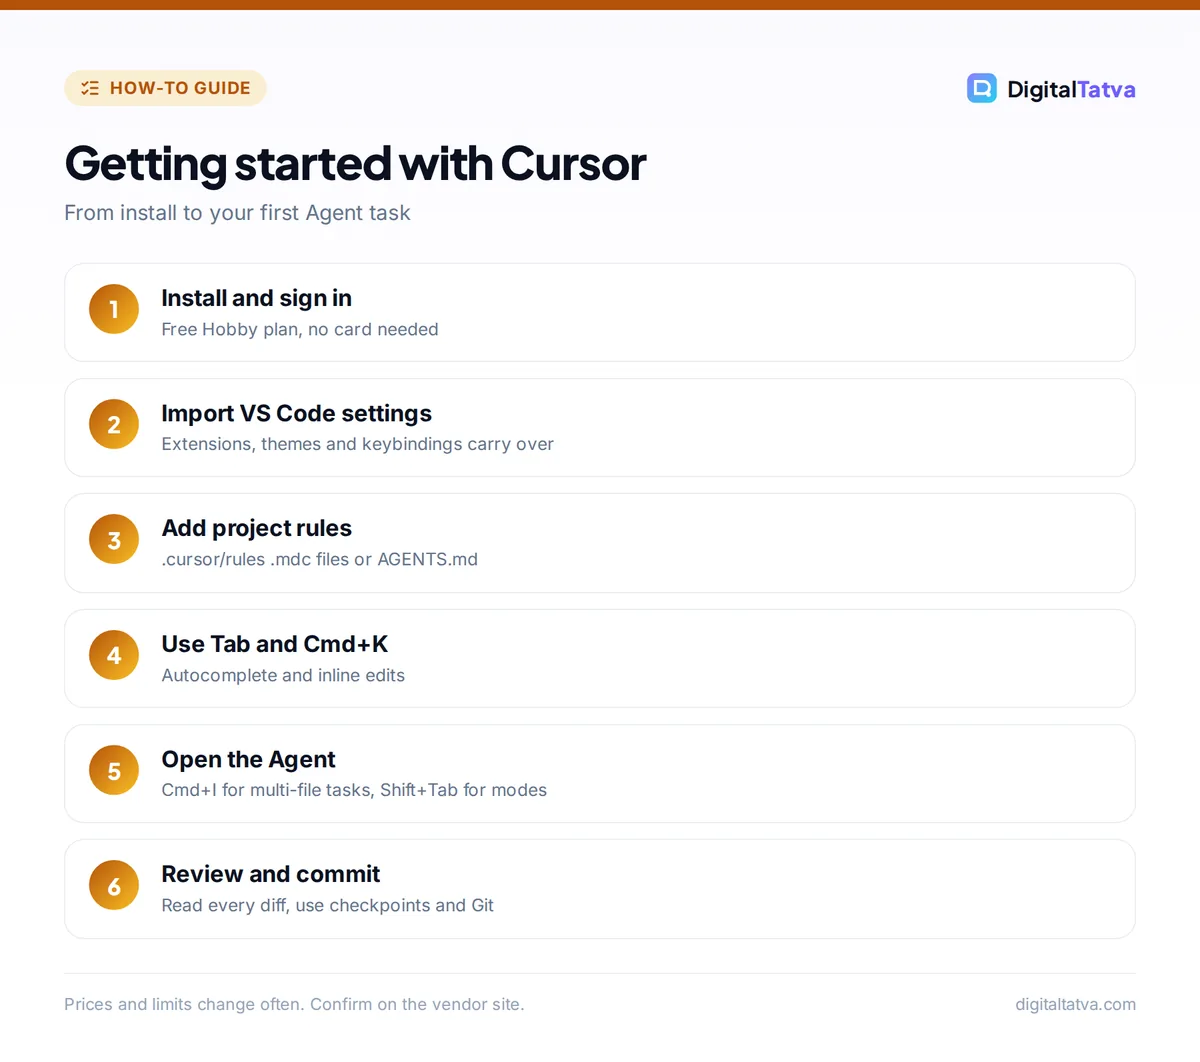
- Download and install Cursor. Go to cursor.com, download the installer for your system and run it. On first launch, Cursor asks you to sign in or create an account.
- Import your VS Code settings. The onboarding screen offers to import extensions, themes, settings and keybindings from VS Code. Accept it if you already use VS Code; your editor will look and behave the same, which removes most of the learning curve.
- Open your project. Use File, then Open Folder, and choose your project root. Cursor indexes the codebase in the background so the Agent can search it. Large repositories take a little longer the first time.
- Check privacy settings. Open Cursor Settings (the gear icon at the top right, or the command palette with Cmd+Shift+P and search “Cursor Settings”). Review privacy mode and data options before you work on client or company code.
- Pick a default model. In the Agent pane, the model picker sits under the message box. Start with a Cursor model such as Composer 2.5 for routine work, since the Cursor Models pool gets significantly more included usage than Claude, GPT or Gemini.
- Add project rules. Create a short rules file that describes your stack, coding style and testing approach (details in the rules section below). Five minutes here saves hours of corrections later.
The three core features: Tab, inline edit and Agent
Tab: autocomplete that predicts your next edit
Start typing and Cursor shows grey ghost text. Press Tab to accept, or keep typing to ignore it. Tab suggests multi-line edits and often jumps you to the next place you are likely to change, for example updating every call site after you rename a parameter. It is unlimited on Pro and higher plans, so lean on it freely.
Cmd+K: inline edits on selected code
Select a block of code and press Cmd+K (Ctrl+K on Windows and Linux). A small prompt box appears above the selection. Type an instruction such as “convert this to async and add error handling” and press Enter. Cursor shows the proposed change inline in green and red; accept or reject it. Inline edit is best for focused changes in one place.
Agent: multi-file tasks from one prompt
Press Cmd+I (Ctrl+I) to open the Agent in the side pane. The Agent can search your files, read the codebase, edit multiple files, run shell commands and even look things up on the web. Give it a task like “add a password reset flow to the auth module, with an email template and tests”. It will plan, make edits and show you each change as a diff to review.
Tip: Point the Agent at the right context with @ mentions. Typing @ in the message box lets you attach specific files, folders or rules, which gives better answers than hoping it finds the right file on its own.
Your first Agent task, step by step
Here is a safe workflow for your first real task. It works the same whether you are building a feature, fixing a bug or writing tests.
- Commit your current work. Start from a clean Git state so you can always see exactly what the AI changed.
- Describe the goal, the constraints and the done condition. For example: “Add pagination to GET /orders. Use the existing cursor helper in utils/pagination. Do not change the response shape for existing clients. Update the tests in tests/orders and make them pass.”
- Attach context with @. Mention the route file, the helper and the test folder.
- Let the Agent work, then read the diffs. Review each file change in the pane. Accept the parts you agree with and reject the rest.
- Run the tests yourself. The Agent can run commands, but confirm the result in your own terminal before you commit.
- Commit with a clear message. Small, frequent commits make AI-assisted work easy to audit and revert.
If you are new to writing instructions for AI, the principles in our prompt engineering guide apply directly: be specific, give examples, and state what “done” looks like.
Agent modes, checkpoints and long tasks
Switch modes with Shift+Tab
Cursor’s Agent has several modes, and you can rotate through them with Shift+Tab or use the mode picker in the Agent pane.
| Mode | What it does | When to use it |
|---|---|---|
| Agent | Writes code and makes changes across files | Most everyday tasks |
| Plan | Creates a detailed implementation plan before writing code | Big features, unclear requirements, architecture choices |
| Debug | Focuses on finding and fixing problems | Failing tests, crashes, odd behavior |
| Design | Design-focused work | UI and layout changes |
Plan mode is the most underused feature among beginners. Ask for a plan, edit it until it matches what you want, then let the Agent build from it. You get fewer surprise changes and fewer wasted requests.
Use checkpoints as an undo button
Checkpoints save snapshots of your codebase during an Agent session. If the Agent heads in the wrong direction, you can preview an earlier checkpoint and restore files to that state. Checkpoints are great for exploration, but they do not replace Git; keep committing.
Queue messages and set goals
While the Agent is working, pressing Enter queues your next message, and Cmd+Enter sends it immediately. For longer projects, the /goal command gives the Agent a long-lived objective to keep working toward until it is complete. Cloud agents on paid plans can run tasks in the background while you keep coding locally.
How to write Cursor rules that actually help
Rules are standing instructions the Agent reads so you do not repeat yourself. Cursor supports three layers:
- Project rules in the .cursor/rules folder, saved as .mdc files with a short frontmatter header. They live in your repository, so the whole team shares them. A plain .md file in that folder is ignored.
- AGENTS.md, a simple markdown file at the project root (and optionally in subfolders) for teams that want something lighter.
- User Rules, set under Customize, then Rules, which apply to every project on your machine, such as “always explain changes briefly”.
Each project rule can be set to Always Apply, Apply Intelligently (the Agent decides based on the description), Apply to Specific Files (matched by a glob pattern such as src/api/*.ts), or Apply Manually when you @-mention it. A good starter rule covers your framework and versions, folder structure, naming style, how to write tests, and things the Agent must never do, such as editing generated files or committing secrets.
Watch out: Long, rambling rules cost tokens on every request and can confuse the model. Keep each rule short and specific, and split topics into separate files so only relevant rules load. Our explainer on the context window shows why less context is often better.
Keep Cursor costs under control
Cursor Pro is $20 per month with unlimited Tab, extended Agent limits and cloud agents. Pro+ is $60 and Ultra is $200, and Teams starts at $40 per user. In India, the Start plan costs Rs 649 per month including tax but only covers the Cursor Models pool. Verified full-time students at accredited US universities can get 12 months of Pro free, according to Cursor’s official forum; see our AI student discounts roundup for details.
The catch is usage. Claude, GPT and Gemini models are charged at API prices, and after included usage runs out, on-demand usage continues at API rates billed in arrears. Cursor says daily agent users typically spend $60 to $100 per month in total. Our guide to AI tokens and the Claude API price list explain what drives those costs.
Save money: Use Composer for routine work, start a new chat for each new task so you are not resending a long history, attach only the files that matter, and check your usage dashboard weekly. More techniques are in our guide to cutting token usage.
Common mistakes beginners make
- Accepting changes without reading them. The Agent can edit more files than you expected. Review every diff.
- Vague prompts. “Fix the bug” wastes requests. Name the file, the symptom and the expected behavior.
- One giant task. Break work into small steps you can test, and commit between them.
- Using the most expensive model for everything. Frontier models drain allowances fast; save them for hard reasoning.
- Skipping rules. Without rules, you will correct the same style issues again and again.
- Pasting secrets into chat. Keep API keys in environment files and check privacy settings before working on client code.
Advanced tips once you are comfortable
- Connect tools with MCP. Paid plans support MCP (Model Context Protocol), which lets the Agent read from databases, issue trackers or docs directly.
- Ask for tests first. Have the Agent write failing tests that describe the feature, then ask it to make them pass.
- Use Bugbot for pull requests. Bugbot reviews PRs on usage-based billing for individuals and is included on Teams.
- Compare with Copilot. If your team uses JetBrains or Visual Studio, read our Cursor vs GitHub Copilot comparison before standardizing.
Frequently asked questions
Is Cursor AI free to use?
Yes. The Hobby plan is free, needs no credit card, and includes limited Agent requests and access to Composer, Cursor’s own model. It is enough to learn the editor and try small projects. Regular users usually move to Pro at $20 per month for unlimited Tab and extended Agent limits, or to the Rs 649 Start plan in India.
Is Cursor good for beginners?
Cursor is beginner friendly if you already know basic programming, because it looks like VS Code and explains code when you ask. Absolute beginners should be careful: accepting code you do not understand slows learning. Ask the Agent to explain its changes in plain words, and review every diff before accepting.
What is the difference between Cmd+K and the Agent in Cursor?
Cmd+K (Ctrl+K on Windows) is an inline edit for a selected block of code, best for small, focused changes. The Agent, opened with Cmd+I, works across the whole project: it searches files, edits many of them, runs commands and shows diffs. Use Cmd+K for quick edits and the Agent for features.
How do I add rules in Cursor?
Create a .cursor/rules folder in your project and add .mdc files with a short frontmatter header and your instructions, or use a single AGENTS.md file at the root. Set each rule to always apply, apply to specific files, apply when relevant, or apply when you @-mention it. Global preferences go under Customize, then Rules.
Can I use my own Claude or GPT models in Cursor?
Cursor includes Claude, GPT and Gemini models in its Other Models pool, charged at each model’s API price, alongside its own Composer and Grok models. You pick the model from the picker under the Agent message box. Check your usage dashboard, because frontier models use up included usage faster than Cursor’s own models.
Next steps
Install Cursor, import your VS Code settings, write one short rules file, and run your first Agent task on a real but low-risk change this week. Once Cursor becomes your daily editor, upgrade to Pro and keep an eye on on-demand usage. For a full assessment of the editor, read our Cursor AI review, and if you are still choosing a tool, compare options in our best AI coding assistants ranking. Pricing and plan limits change often, so confirm current details on the official Cursor pricing page and the Cursor rules documentation before you rely on them.
Pricing and features are checked at the time of writing and can change. Some links may be affiliate links, which never affect our verdicts.